Starting a roast at high heat sears the meat's surface, locking in juices and creating a flavorful crust while enhancing the Maillard reaction for a rich, caramelized exterior. Finishing the roast at low heat ensures even cooking throughout, preventing dryness and allowing the meat to become tender and juicy. Combining high heat start with low heat finish optimizes both texture and flavor, resulting in a perfectly roasted pet with a crispy outside and succulent inside.
Table of Comparison
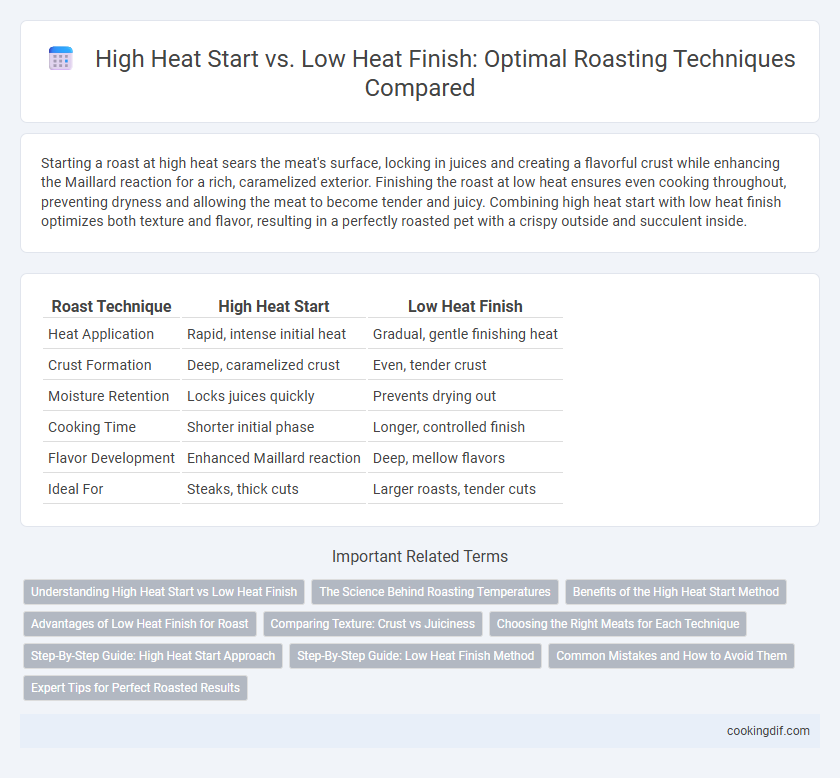
| Roast Technique | High Heat Start | Low Heat Finish |
|---|---|---|
| Heat Application | Rapid, intense initial heat | Gradual, gentle finishing heat |
| Crust Formation | Deep, caramelized crust | Even, tender crust |
| Moisture Retention | Locks juices quickly | Prevents drying out |
| Cooking Time | Shorter initial phase | Longer, controlled finish |
| Flavor Development | Enhanced Maillard reaction | Deep, mellow flavors |
| Ideal For | Steaks, thick cuts | Larger roasts, tender cuts |
Understanding High Heat Start vs Low Heat Finish
High heat start in roasting sears the meat quickly, creating a flavorful crust via the Maillard reaction and locking in juices, essential for a rich, caramelized exterior. Low heat finish ensures even cooking throughout, breaking down connective tissues gradually, resulting in tender, juicy meat with consistent doneness. Balancing these techniques optimizes texture and depth of flavor in cuts like prime rib or pork shoulder.
The Science Behind Roasting Temperatures
High heat start during roasting triggers the Maillard reaction rapidly, developing rich, complex flavors and a crispy exterior by browning sugars and amino acids effectively. Low heat finish allows internal temperatures to rise gradually, ensuring even cooking and preserving juicy tenderness without overcooking the meat fibers. Balancing these temperature phases optimizes flavor depth, texture, and moisture retention based on heat transfer and protein denaturation principles.
Benefits of the High Heat Start Method
Starting a roast with high heat sears the surface, locking in juices and creating a rich, flavorful crust that enhances the overall taste. This method accelerates Maillard reactions, producing intense browning and complex flavors that low heat cannot achieve initially. High heat start also reduces cooking time by quickly raising the interior temperature, preserving moisture and ensuring a tender, succulent roast.
Advantages of Low Heat Finish for Roast
Finishing a roast with low heat enhances even cooking and preserves moisture, resulting in a tender, juicy interior. This technique reduces the risk of overcooking the outer layers while allowing connective tissues to break down gently. The slow, gentle heat also helps develop deeper, more complex flavors through gradual caramelization without drying out the meat.
Comparing Texture: Crust vs Juiciness
Starting a roast with high heat creates a deeply caramelized, crispy crust that locks in moisture, enhancing overall texture contrast. Finishing with low heat allows the interior to cook gently and evenly, preserving juiciness and tenderness throughout the roast. This combination maximizes crust development while maintaining a succulent, moist center, balancing both textural elements effectively.
Choosing the Right Meats for Each Technique
High heat start roasting is ideal for tender cuts like ribeye, sirloin, or tenderloin that benefit from a quick sear to lock in juices and develop a flavorful crust. Low heat finish roasting suits tougher cuts such as brisket, chuck, or pork shoulder, allowing connective tissues to break down slowly, resulting in tender, melt-in-your-mouth textures. Selecting the right meat for each roasting method ensures optimal flavor, tenderness, and moisture retention in the final dish.
Step-By-Step Guide: High Heat Start Approach
Begin the roast by preheating your oven to 450degF (232degC) to sear the exterior of the meat, locking in juices and creating a flavorful crust. After 15 minutes at high heat, reduce the oven temperature to 325degF (163degC) to allow the roast to cook evenly and develop tenderness without drying out. This step-by-step high heat start approach maximizes flavor while ensuring a perfectly cooked interior.
Step-By-Step Guide: Low Heat Finish Method
Begin by searing the roast on high heat to develop a flavorful, caramelized crust, locking in juices effectively. Transition to a low heat finish by reducing the oven temperature to around 275degF (135degC) to ensure even cooking and maintain tenderness. This method allows the roast's internal temperature to rise gradually, preventing overcooking and enhancing moisture retention for a juicy, perfectly cooked result.
Common Mistakes and How to Avoid Them
Starting a roast at high heat often leads to burnt exteriors with undercooked interiors, a common mistake that can result in uneven doneness and dry texture. Finishing the roast at low heat helps maintain moisture and allows the interior to cook evenly, avoiding toughness and preserving flavor. To prevent these issues, initiate the roast with a controlled high temperature for browning, then reduce heat gradually to ensure thorough cooking without sacrificing juiciness.
Expert Tips for Perfect Roasted Results
Starting a roast with high heat sears the exterior, locking in juices and developing a rich, caramelized crust essential for flavor depth. Finishing the roast at low heat ensures even cooking throughout, preventing dryness and preserving tender, succulent meat. Expert chefs recommend monitoring internal temperature closely, aiming for 10-15 degrees below the target before resting, allowing carryover heat to achieve perfect doneness without overcooking.
High Heat Start vs Low Heat Finish for Roast Technique Infographic