Reverse sear offers more even cooking by slowly bringing the roast to temperature before finishing with high heat, preserving tenderness and juiciness. Traditional sear starts with a hot pan to brown the exterior, sealing in flavors but risks uneven cooking or overcooked edges. Choosing between them depends on desired texture and doneness precision, with reverse searing favored for consistent results.
Table of Comparison
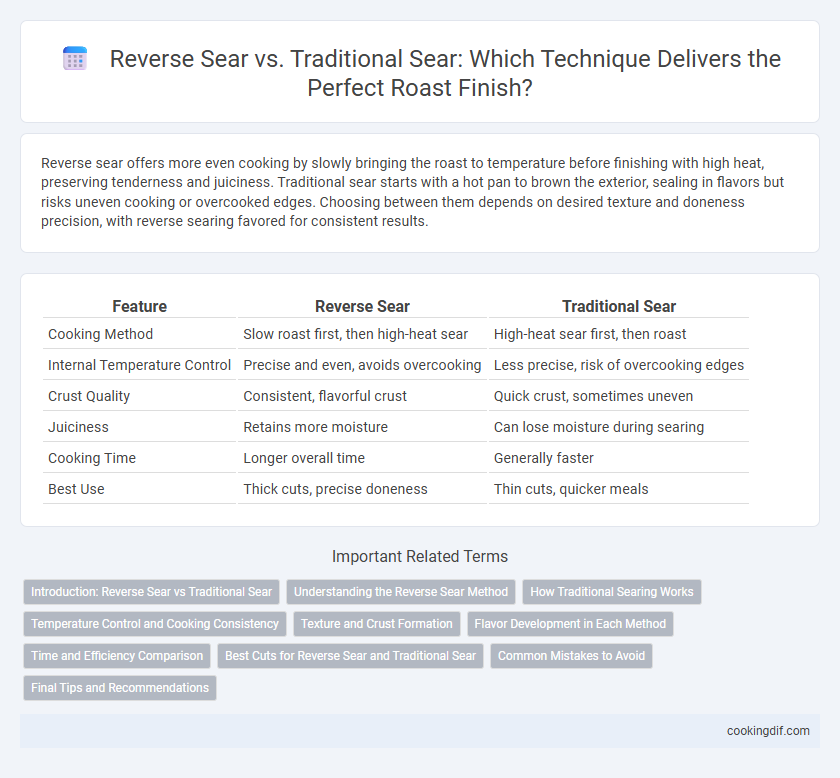
| Feature | Reverse Sear | Traditional Sear |
|---|---|---|
| Cooking Method | Slow roast first, then high-heat sear | High-heat sear first, then roast |
| Internal Temperature Control | Precise and even, avoids overcooking | Less precise, risk of overcooking edges |
| Crust Quality | Consistent, flavorful crust | Quick crust, sometimes uneven |
| Juiciness | Retains more moisture | Can lose moisture during searing |
| Cooking Time | Longer overall time | Generally faster |
| Best Use | Thick cuts, precise doneness | Thin cuts, quicker meals |
Introduction: Reverse Sear vs Traditional Sear
Reverse sear involves slow-cooking the roast at a low temperature before finishing with a high-heat sear for a uniform interior and a crispy crust. Traditional sear starts with high heat to create a crust, then finishes with lower heat to cook through, often resulting in less even doneness. Both techniques impact flavor development and texture, with reverse searing generally offering better temperature control and juiciness.
Understanding the Reverse Sear Method
The reverse sear method involves slow-cooking a roast at a low temperature before searing it at high heat, which results in a more evenly cooked interior with a consistent pink center and a flavorful crust. This technique contrasts with the traditional sear method, where the roast is first seared to lock in juices and then cooked through, often causing an uneven doneness near the edges. Reverse searing is particularly effective for thicker cuts of meat such as ribeye or prime rib, enhancing tenderness and flavor while minimizing overcooked edges.
How Traditional Searing Works
Traditional searing involves cooking the roast at high heat initially, creating a caramelized crust that locks in juices and enhances flavor through the Maillard reaction. This method starts by searing the surface on a hot pan or grill, then transferring the roast to an oven for even cooking to the desired doneness. The intense initial heat promotes browning and texture contrast but can sometimes cause uneven internal temperature distribution.
Temperature Control and Cooking Consistency
Reverse sear offers superior temperature control and cooking consistency by slowly bringing the roast to an even internal temperature before applying a high-heat sear, minimizing overcooked edges and undercooked centers. Traditional searing, performed at the start, risks uneven cooking due to rapid crust formation and less regulated heat penetration. Precision temperature probes used in reverse sear methods ensure consistent doneness, enhancing texture and flavor throughout the roast.
Texture and Crust Formation
Reverse sear enhances roast texture by cooking meat evenly at low temperatures before a high-heat finish, producing a tender interior with a pronounced crust. Traditional sear involves high-heat surface cooking first, resulting in a robust crust but a less uniform texture. The reverse sear method optimizes Maillard reaction, creating a savory crust while preserving juiciness throughout the roast.
Flavor Development in Each Method
Reverse sear enhances flavor development by slowly cooking the roast at low temperatures, allowing juices to redistribute and intensify umami-rich flavors before finishing with a high-heat sear that creates a deeply caramelized crust. Traditional sear initiates flavor through an immediate high-heat crust formation, locking in moisture and generating Maillard reaction compounds, but it can result in less even doneness and variable internal flavor complexity. Optimal roast flavor depends on balancing Maillard-induced crustiness with thorough internal cooking, where reverse sear excels in uniform flavor development and traditional sear delivers robust initial crust notes.
Time and Efficiency Comparison
Reverse sear takes longer overall, requiring low-temperature cooking followed by a quick high-heat finish, but ensures even doneness and perfect crust. Traditional sear finishes faster by cooking at high heat first, often resulting in uneven internal temperature and more variability in doneness. For efficiency, traditional sear saves time but sacrifices precision, while reverse sear optimizes cooking control at the expense of longer cook time.
Best Cuts for Reverse Sear and Traditional Sear
Reverse sear excels with thick, tough cuts like ribeye, strip loin, or tomahawk due to its low-and-slow cooking method that ensures even doneness and a tender interior before developing a crust. Traditional sear suits thinner or more tender cuts such as filet mignon, sirloin, or flank steak, where a quick high-heat sear locks in juices and creates a flavorful crust without overcooking. Choosing the right cut for each method maximizes flavor, texture, and overall roast quality.
Common Mistakes to Avoid
Overcooking the meat's surface while attempting a traditional sear results in a dry, tough crust that compromises flavor and texture. Reverse searing pitfalls often include insufficient resting time after the low-temperature cook, causing uneven juices during the final sear. Avoid flipping the roast too frequently during either method to maintain a consistent brown crust and optimal internal temperature.
Final Tips and Recommendations
For the best roast finish, reverse sear ensures even cooking and a consistent medium-rare center by slow-roasting first, then searing to develop a flavorful crust. Traditional sear, applied before roasting, locks in juices but risks uneven doneness. Final recommendations prioritize using a meat thermometer to monitor internal temperature and resting the roast for 15-20 minutes to redistribute juices for optimal tenderness.
Reverse sear vs Traditional sear for roast finish Infographic