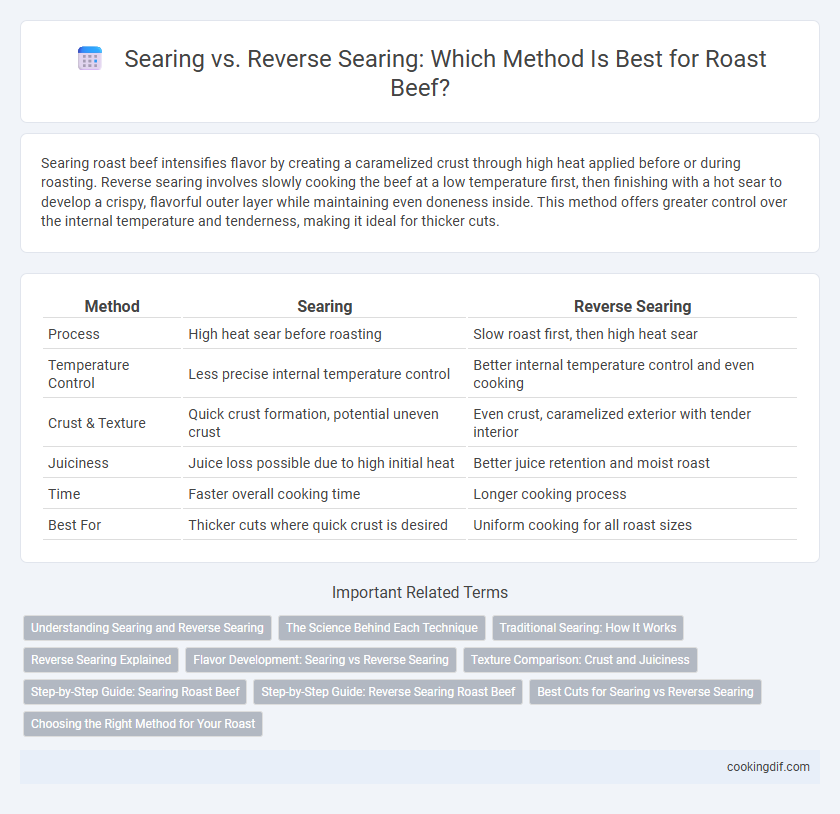
Searing roast beef intensifies flavor by creating a caramelized crust through high heat applied before or during roasting. Reverse searing involves slowly cooking the beef at a low temperature first, then finishing with a hot sear to develop a crispy, flavorful outer layer while maintaining even doneness inside. This method offers greater control over the internal temperature and tenderness, making it ideal for thicker cuts.
Table of Comparison
| Method | Searing | Reverse Searing |
|---|---|---|
| Process | High heat sear before roasting | Slow roast first, then high heat sear |
| Temperature Control | Less precise internal temperature control | Better internal temperature control and even cooking |
| Crust & Texture | Quick crust formation, potential uneven crust | Even crust, caramelized exterior with tender interior |
| Juiciness | Juice loss possible due to high initial heat | Better juice retention and moist roast |
| Time | Faster overall cooking time | Longer cooking process |
| Best For | Thicker cuts where quick crust is desired | Uniform cooking for all roast sizes |
Understanding Searing and Reverse Searing
Searing roast beef involves cooking the meat at high heat initially to create a flavorful crust, locking in juices and enhancing Maillard reactions for rich taste and texture. Reverse searing starts with slow roasting the beef at a low temperature, allowing even cooking and a tender interior, followed by a high-heat sear to develop a caramelized exterior. Understanding these methods helps optimize roast beef's flavor, juiciness, and overall eating experience by balancing interior doneness and crust quality.
The Science Behind Each Technique
Searing locks moisture and develops a flavorful crust through the Maillard reaction, creating complex browning compounds on roast beef's surface. Reverse searing gradually raises internal temperature by slow roasting before finishing with high heat, allowing for even cooking and enhanced juiciness. Both techniques manipulate heat transfer and protein denaturation differently to optimize texture and taste.
Traditional Searing: How It Works
Traditional searing for roast beef involves cooking the meat at a high temperature first to create a caramelized crust through the Maillard reaction, which enhances flavor and texture. This method locks in juices by quickly forming a seared exterior, while the interior cooks to the desired doneness afterward, usually in an oven. Searing traditionally occurs on a hot skillet or grill before roasting, establishing a savory, browned surface essential for classic roast beef recipes.
Reverse Searing Explained
Reverse searing for roast beef involves slowly cooking the meat at a low temperature before finishing with a high-heat sear to develop a caramelized crust. This method ensures even doneness throughout the roast, maximizing juiciness and tenderness. Using an oven or sous vide to cook followed by a cast-iron skillet or grill sear enhances flavor without overcooking the exterior.
Flavor Development: Searing vs Reverse Searing
Searing roast beef creates a Maillard reaction on the surface, intensifying flavor through caramelization and producing a rich, savory crust. Reverse searing, which involves slow roasting followed by a high-heat sear, develops deeper, more uniform flavor by allowing juices to redistribute before creating the crust. This method enhances tenderness and amplifies the beef's natural flavors with a more complex, evenly browned exterior.
Texture Comparison: Crust and Juiciness
Searing roast beef creates a thick, flavorful crust through high-heat caramelization, while reverse searing develops a more even crust with enhanced tenderness. The reverse sear method retains more internal juiciness by slowly cooking the meat before finishing with a quick high-temperature sear. Texture-wise, searing offers a robust crust with slightly less uniform doneness, whereas reverse searing yields a consistent medium-rare center with a delicate, crispy exterior.
Step-by-Step Guide: Searing Roast Beef
Searing roast beef involves heating a pan to high temperature and browning all sides of the meat to create a flavorful crust that locks in juices. Begin by patting the beef dry, seasoning with salt and pepper, then searing each side for 2-3 minutes until a deep golden-brown crust forms. This step enhances Maillard reaction flavors and prepares the roast for even cooking whether roasting traditionally or using the reverse searing method.
Step-by-Step Guide: Reverse Searing Roast Beef
Reverse searing roast beef involves slowly cooking the meat at a low temperature, usually around 225degF (107degC), until it reaches an internal temperature of 120-125degF (49-52degC) for medium rare. After the slow roast, sear the beef in a hot skillet or under a broiler for 1-2 minutes per side to develop a flavorful, caramelized crust. This method ensures even cooking and a tender, juicy interior with a perfect crust.
Best Cuts for Searing vs Reverse Searing
For traditional searing, cuts like ribeye, sirloin, and tenderloin excel due to their marbling and tenderness, which develop a flavorful crust when cooked at high heat first. Reverse searing works best with thicker or leaner cuts such as prime rib, chuck roast, or top round, as slow roasting preserves juiciness before a final sear enhances the exterior texture. Choosing the right cut for each method ensures optimal flavor, tenderness, and moisture retention in the roast beef.
Choosing the Right Method for Your Roast
Searing roast beef involves high heat to quickly brown the surface, locking in juices and creating a flavorful crust, while reverse searing begins with low-temperature cooking followed by a final high-heat sear for even doneness and enhanced tenderness. Choosing the right method depends on roast size and desired texture; searing suits smaller, thinner cuts needing a crisp exterior, whereas reverse searing is ideal for thicker roasts requiring precise internal temperature control. Understanding the benefits of each technique ensures a perfectly cooked roast beef with optimal flavor and juiciness.
Searing vs reverse searing for roast beef Infographic