The crumb coat is a thin layer of frosting applied early to seal in crumbs and create a smooth base. The final coat, often thicker and more polished, provides the cake's finished appearance and enhances flavor. Proper crumb coating ensures a clean, professional look by preventing crumb mix-in during the final frosting stage.
Table of Comparison
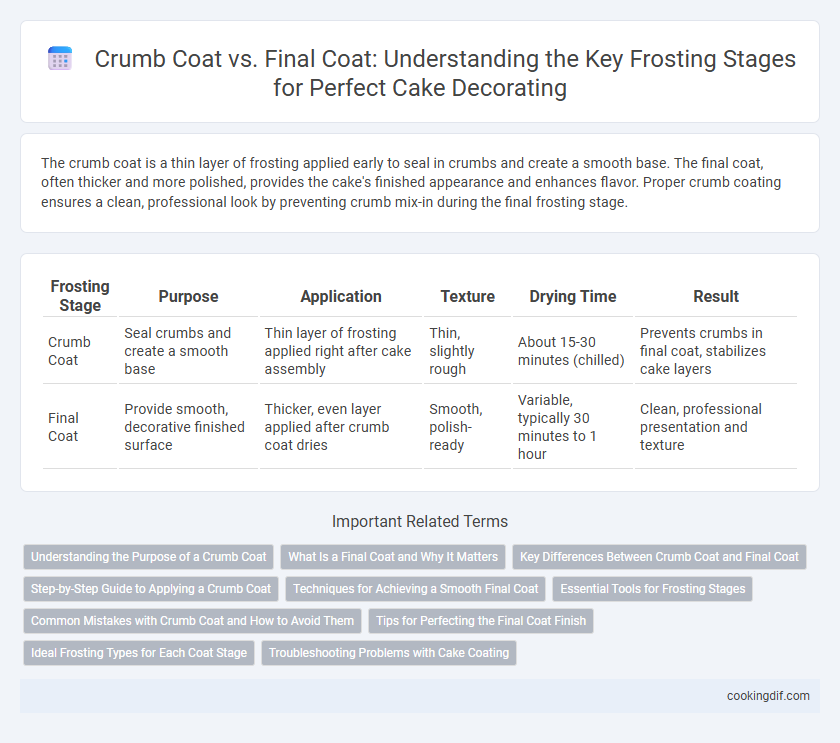
| Frosting Stage | Purpose | Application | Texture | Drying Time | Result |
|---|---|---|---|---|---|
| Crumb Coat | Seal crumbs and create a smooth base | Thin layer of frosting applied right after cake assembly | Thin, slightly rough | About 15-30 minutes (chilled) | Prevents crumbs in final coat, stabilizes cake layers |
| Final Coat | Provide smooth, decorative finished surface | Thicker, even layer applied after crumb coat dries | Smooth, polish-ready | Variable, typically 30 minutes to 1 hour | Clean, professional presentation and texture |
Understanding the Purpose of a Crumb Coat
The crumb coat serves as a thin base layer of frosting applied to a cake to trap loose crumbs, ensuring a smooth and clean surface for the final coat. This initial layer solidifies the cake's structure, preventing crumb mixing with the outer decorative frosting. Applying a crumb coat enhances the appearance and texture of the final coat, resulting in a polished and professional cake finish.
What Is a Final Coat and Why It Matters
The final coat in cake frosting is the smooth, polished layer applied after the crumb coat, designed to create a flawless surface for decoration. Unlike the crumb coat, which traps loose crumbs and provides a base, the final coat enhances the cake's appearance and ensures the frosting adheres properly for detailed designs. This stage is essential for achieving professional-looking cakes with clean finishes and sharp edges.
Key Differences Between Crumb Coat and Final Coat
The crumb coat is a thin, initial layer of frosting applied to seal in cake crumbs and create a smooth base, while the final coat is a thicker, more polished layer for decoration and appearance. Crumb coats are usually chilled to set before the final coat is applied, ensuring a clean and flawless finish. The final coat emphasizes texture, color, and design details, making it essential for cake presentation and aesthetics.
Step-by-Step Guide to Applying a Crumb Coat
Start by spreading a thin layer of frosting over the entire cake to create the crumb coat, which seals in loose crumbs and provides a smooth surface for the final coat. Use a spatula or bench scraper to evenly distribute the frosting, ensuring all crumbs are trapped and the cake edges are sharp. Chill the cake for 15-30 minutes after applying the crumb coat to firm up the frosting before applying the final coat for a flawless finish.
Techniques for Achieving a Smooth Final Coat
Applying a crumb coat involves spreading a thin layer of frosting to seal in cake crumbs, creating a stable base for the final coat. Techniques for a smooth final coat include chilling the crumb-coated cake to firm the frosting, using an offset spatula to spread frosting evenly, and smoothing with a bench scraper or cake scraper at a consistent angle. Proper temperature control of the frosting and patience during each stage ensures a flawless, polished finish.
Essential Tools for Frosting Stages
Essential tools for the crumb coat stage include an offset spatula and a bench scraper, which help create a thin, even layer of frosting to seal in crumbs. For the final coat, a smoother frosting spatula and a turntable are critical to achieve a polished, flawless finish. Consistent temperature and well-chilled cake layers ensure smoother application during both stages.
Common Mistakes with Crumb Coat and How to Avoid Them
Applying the crumb coat too thickly can trap air bubbles, leading to uneven final frosting, so use a thin, even layer to seal crumbs without excess frosting. Skipping refrigeration of the crumb coat often causes the final coat to mix with crumbs, resulting in a messy appearance; chilling the cake for 15-30 minutes ensures a firm base. Avoid using a warm or overly soft crumb coat, as it can smudge when applying the final coat; opt for a slightly chilled, smooth-textured layer for optimal results.
Tips for Perfecting the Final Coat Finish
Apply a thin crumb coat to lock in loose crumbs and refrigerate it until firm, ensuring a smooth base for the final coat. Use an offset spatula and a bench scraper to spread the final coat evenly, working quickly to maintain a smooth texture without air bubbles. Chill the cake briefly between layers and warm your spatula slightly for flawless, sharp edges and a professional finish.
Ideal Frosting Types for Each Coat Stage
A crumb coat requires a thin, slightly stiff frosting like buttercream or ganache to trap loose crumbs and create a smooth base for the final layer. The final coat benefits from a smoother, softer frosting such as Swiss meringue buttercream or cream cheese frosting to achieve a polished and flawless finish. Choosing the right frosting consistency enhances adhesion during the crumb coat and ensures an even, aesthetically pleasing final coat.
Troubleshooting Problems with Cake Coating
Crumb coat helps trap loose crumbs, creating a smooth base that prevents them from mixing into the final coat, essential for a clean finish. Problems like uneven texture or visible crumbs occur when the crumb coat is too thin or rushed, causing imperfections in the final frosting layer. Applying a chilled crumb coat allows easier sanding and smoother application of the final coat, ensuring a flawless cake surface ready for decoration.
Crumb coat vs Final coat for frosting stages Infographic