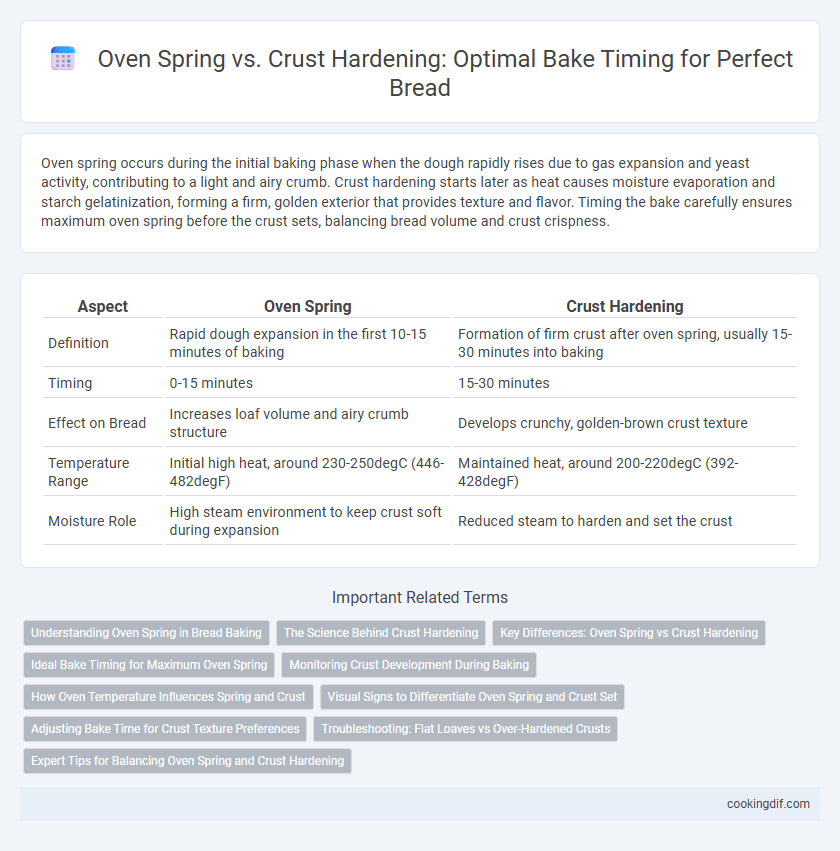
Oven spring occurs during the initial baking phase when the dough rapidly rises due to gas expansion and yeast activity, contributing to a light and airy crumb. Crust hardening starts later as heat causes moisture evaporation and starch gelatinization, forming a firm, golden exterior that provides texture and flavor. Timing the bake carefully ensures maximum oven spring before the crust sets, balancing bread volume and crust crispness.
Table of Comparison
| Aspect | Oven Spring | Crust Hardening |
|---|---|---|
| Definition | Rapid dough expansion in the first 10-15 minutes of baking | Formation of firm crust after oven spring, usually 15-30 minutes into baking |
| Timing | 0-15 minutes | 15-30 minutes |
| Effect on Bread | Increases loaf volume and airy crumb structure | Develops crunchy, golden-brown crust texture |
| Temperature Range | Initial high heat, around 230-250degC (446-482degF) | Maintained heat, around 200-220degC (392-428degF) |
| Moisture Role | High steam environment to keep crust soft during expansion | Reduced steam to harden and set the crust |
Understanding Oven Spring in Bread Baking
Oven spring is the rapid rise of bread dough during the first minutes of baking, driven by yeast activity and steam expansion, which significantly impacts the bread's volume and crumb structure. Timing the bake to maximize oven spring before crust hardening ensures a light, airy texture while a premature crust formation restricts expansion, resulting in denser bread. Understanding the balance between maintaining dough elasticity and controlling crust development is crucial for achieving optimal loaf volume and texture.
The Science Behind Crust Hardening
Crust hardening occurs as water evaporates from the dough's surface during baking, initiating Maillard reactions that create a firm, flavorful crust. Oven spring, the rapid expansion of gases in the first minutes of baking, is crucial to bread volume but is hindered if crust hardening happens too early. Controlling oven temperature and steam levels optimizes the balance between maximizing oven spring and achieving a desirable crust texture through delayed crust hardening.
Key Differences: Oven Spring vs Crust Hardening
Oven spring refers to the rapid rise of bread dough in the first few minutes of baking, driven by the expansion of gases and yeast activity, crucial for achieving a light, airy crumb. Crust hardening occurs later in the bake as moisture evaporates and sugars caramelize, forming a firm, flavorful exterior that locks in freshness. Timing the bake properly ensures optimal oven spring before crust hardening sets, balancing volume and texture for perfect bread.
Ideal Bake Timing for Maximum Oven Spring
Ideal bake timing for maximum oven spring occurs during the initial high heat phase when yeast activity and gas expansion peak, causing the dough to rapidly rise. Extending baking time too long at high temperatures can lead to premature crust hardening, which restricts oven spring and locks in moisture unevenly. Achieving a balance between early strong heat and subsequent moderate baking ensures optimal rise and a crispy, well-developed crust.
Monitoring Crust Development During Baking
Monitoring crust development during baking is essential to balance oven spring and crust hardening, as excessive heat can cause premature crust formation that restricts dough expansion. Optimal bake timing ensures the oven spring is maximized before the crust solidifies, resulting in a light, airy crumb with a thin, crisp crust. Using thermometers and visual cues helps bakers identify the perfect moment to adjust oven temperature or remove the bread to preserve both texture and volume.
How Oven Temperature Influences Spring and Crust
Oven temperature directly impacts oven spring and crust hardening during bread baking by controlling gas expansion and moisture evaporation rates. Higher temperatures promote rapid yeast activity and CO2 release, enhancing oven spring but can cause the crust to harden too quickly, limiting volume expansion. Optimizing the temperature balance extends gas retention for better rise while preventing premature crust formation, resulting in a well-aerated crumb and desirable crust texture.
Visual Signs to Differentiate Oven Spring and Crust Set
Oven spring is visually indicated by rapid dough expansion and visible swelling within the first 5-10 minutes of baking, while crust hardening appears as a firm, golden-brown surface forming later in the process, typically after 15-20 minutes. The dough's surface during oven spring remains soft and moist, whereas crust set creates a distinct, crisp texture that resists indentation. Monitoring these visual signs helps bakers optimize timing for perfect loaf volume and crust development.
Adjusting Bake Time for Crust Texture Preferences
Achieving the ideal crust texture in bread baking requires balancing oven spring and crust hardening by adjusting bake time and temperature. Shortening the bake time can enhance oven spring, resulting in a lighter, airier crumb, while extending bake time promotes crust hardening and a deeper, crunchier exterior. Bakers often experiment with lowering the oven temperature late in the bake to maintain oven spring while developing a firm crust tailored to individual texture preferences.
Troubleshooting: Flat Loaves vs Over-Hardened Crusts
Oven spring is crucial for achieving a light, airy crumb by allowing rapid gas expansion during the first minutes of baking, while crust hardening signals the transition to crust formation. Troubleshooting flat loaves often involves insufficient oven spring caused by under-proofing, low oven temperature, or inadequate steam. Over-hardened crusts result from excessive bake times or high heat without steam, which dehydrates the crust prematurely and must be balanced to ensure optimal texture and volume.
Expert Tips for Balancing Oven Spring and Crust Hardening
Balancing oven spring and crust hardening requires precise control of oven temperature and steam during the first phase of baking to maximize loaf volume while preventing premature crust formation. Expert bakers recommend starting with high heat around 230-250degC (450-480degF) combined with steam for the first 10-15 minutes to promote optimal oven spring, then lowering the temperature and reducing steam to develop a well-caramelized, firm crust without over-hardening. Monitoring internal bread temperature and adjusting bake times based on dough hydration and flour type ensures perfect texture and crust development.
Oven Spring vs Crust Hardening for bake timing Infographic