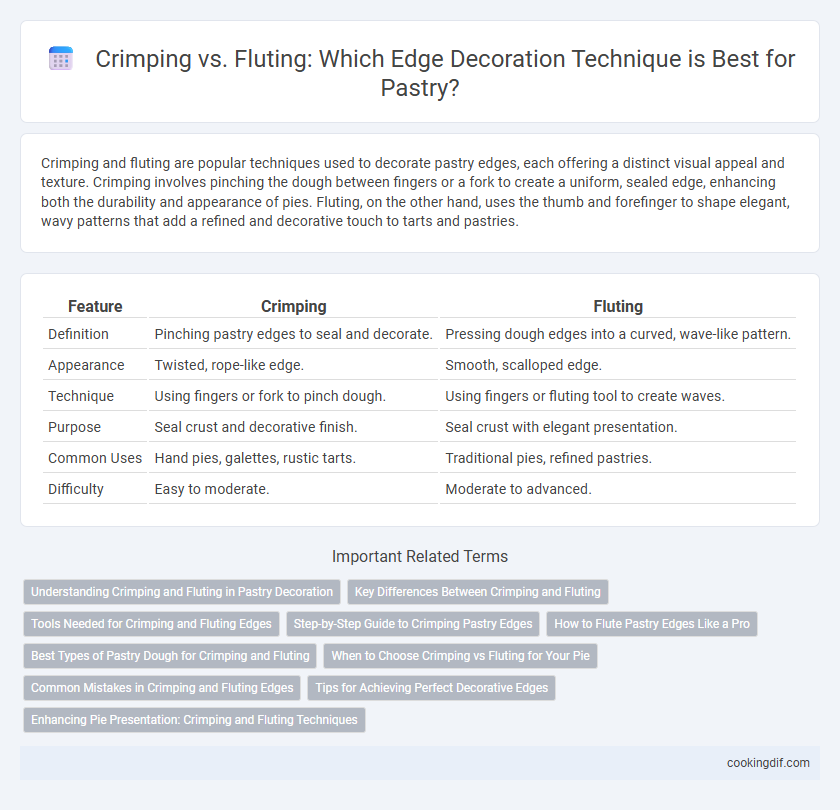
Crimping and fluting are popular techniques used to decorate pastry edges, each offering a distinct visual appeal and texture. Crimping involves pinching the dough between fingers or a fork to create a uniform, sealed edge, enhancing both the durability and appearance of pies. Fluting, on the other hand, uses the thumb and forefinger to shape elegant, wavy patterns that add a refined and decorative touch to tarts and pastries.
Table of Comparison
| Feature | Crimping | Fluting |
|---|---|---|
| Definition | Pinching pastry edges to seal and decorate. | Pressing dough edges into a curved, wave-like pattern. |
| Appearance | Twisted, rope-like edge. | Smooth, scalloped edge. |
| Technique | Using fingers or fork to pinch dough. | Using fingers or fluting tool to create waves. |
| Purpose | Seal crust and decorative finish. | Seal crust with elegant presentation. |
| Common Uses | Hand pies, galettes, rustic tarts. | Traditional pies, refined pastries. |
| Difficulty | Easy to moderate. | Moderate to advanced. |
Understanding Crimping and Fluting in Pastry Decoration
Crimping in pastry decoration involves pinching the edges of dough between fingers or with a fork to seal and create a decorative pattern, enhancing both appearance and structure. Fluting, on the other hand, uses the thumb and forefinger or a fluting tool to form a scalloped edge that adds an elegant finish and ensures tight sealing for pies and tarts. Mastering both techniques improves visual appeal and prevents filling leakage during baking, essential for professional pastry presentation.
Key Differences Between Crimping and Fluting
Crimping creates a tighter, more sealed edge on pastries by pinching the dough between fingers or a fork, ensuring a secure closure that prevents filling leakage. Fluting involves shaping the edge into a decorative pattern using fingers or a specialized tool, adding an aesthetic appeal without necessarily increasing the seal's strength. The key difference lies in crimping's functional focus on sealing, while fluting emphasizes ornamental design.
Tools Needed for Crimping and Fluting Edges
Crimping edges typically require a fork or crimping tool to press and seal the dough, creating a uniform, ridged pattern that enhances both appearance and structure. Fluting edges involve using fingers or specialized fluting shears to pinch and shape the dough into scalloped or wave-like designs, adding an elegant touch to pastries. Both techniques depend on specific tools that influence the texture and visual appeal of finished baked goods.
Step-by-Step Guide to Crimping Pastry Edges
Crimping pastry edges involves pinching the dough between your thumb and forefinger to create a secure, decorative seal that prevents filling leakage during baking. Start by folding the edge of the dough slightly inward, then use your thumb and forefinger to pinch small sections tightly, repeating this along the entire edge. This technique not only ensures durability but also adds a classic, handcrafted look to pies, tarts, and pastries.
How to Flute Pastry Edges Like a Pro
Fluting pastry edges involves pinching the dough between your thumb and forefinger to create a consistent, wavy pattern that enhances both appearance and texture. Mastering this technique requires even pressure and spacing, which prevents shrinking and promotes uniform baking. Using a small spoon or your fingers, practice gentle, rhythmic pinches along the edge for professional-quality fluted pastries.
Best Types of Pastry Dough for Crimping and Fluting
Crimping works best with sturdy pastry doughs like shortcrust and pate brisee, which hold their shape well under pressure without cracking, creating tight, sealed edges perfect for pies and tarts. Fluting suits delicate, pliable doughs such as puff pastry and choux pastry, where intricate edge designs enhance both texture and visual appeal without compromising the dough's lightness. Choosing the right pastry dough ensures a visually appealing finish while maintaining structural integrity for both crimped and fluted edges.
When to Choose Crimping vs Fluting for Your Pie
Crimping suits thick pie crusts that require a strong seal, preventing filling leakage during baking, especially for fruit pies with juicy interiors. Fluting is ideal for thinner, more delicate crusts where aesthetic presentation is prioritized, such as in custard or cream pies. Selecting between crimping and fluting directly affects the pie's structural integrity and visual appeal based on crust thickness and filling type.
Common Mistakes in Crimping and Fluting Edges
Common mistakes in crimping and fluting pastry edges include uneven pressure causing inconsistent patterns and over-handling dough, which leads to tearing or shrinking during baking. Using dull tools or improper finger placement can result in poorly defined edges that fail to seal the pastry properly. Ensuring uniform technique and maintaining dough temperature are crucial to achieving crisp, visually appealing decorative edges.
Tips for Achieving Perfect Decorative Edges
To achieve perfect decorative edges on pastries, ensure consistent pressure and spacing when crimping to create uniform ridges that seal fillings effectively. For fluting, use a pinching and pressing motion with your fingers or a fluting tool to produce even, attractive waves that enhance both appearance and texture. Chilling dough slightly before shaping helps maintain edge definition and prevents shrinkage during baking.
Enhancing Pie Presentation: Crimping and Fluting Techniques
Crimping and fluting are essential techniques that enhance pie presentation by creating visually appealing and distinct edges. Crimping involves pinching the dough between fingers or with a fork to form a uniform, textured border that helps seal the pie, while fluting uses the thumb and index finger to shape elegant, wave-like patterns along the crust. Both methods improve the pie's structural integrity, prevent filling leakage, and elevate the overall aesthetic, making pastries more attractive and professional-looking.
Crimping vs Fluting for edge decoration Infographic